Funky Krafts
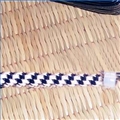
Duct Tape bracelet
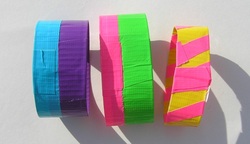
to make a duct tape bracelet take one color of duct tape and fold it half way over and then fold the other half over. after that take a little piece of duct tape and put it one of the sides . the rap it around your rist and secure it. thats how to make a duct tape bracelet have fun!!!!!!!!!!
Tilly the turtle
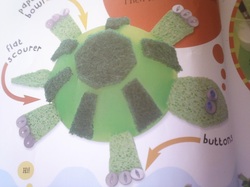
the things you need to make Tilly the turtle are paint ,flat scourers, glue , sissor, paint brush, paper bowl, flat sponges, wool, buttons , beads ,the first step to making Tilly is to cut six slits 1 for her tail 1 for her head 4 for her legs.then paint the bowl whatever color you want.then cut whatever shapes you want from the flat scourers or sponges on his back for decorations.after you are done with that cut out Tillys head tail and legs from the flat scourers or sponges them push them good into the slits in the bowl.finally the last step is to glue on the buttons and beads for Tilly's eyes and feet then tape on the long peice of wool on to Tilly and take Tilly for a walk!!!!!!!!!!!!!!!
paper cup telephone
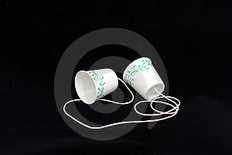
to make a paper cup telephone you will need 2 paper cups and some yarn. Then put a hole just big enough in the bottom of the cup to fit the yarn in. After that slide the yarn through the hole then tie a tight knot for both of the cans. hTen grab a partner and go have fun!!!!!
potato buddy
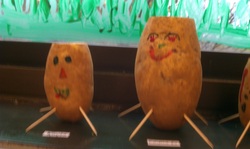
to make your potato buddy you need to cut the top of the potato off then put a little hole in the top where you cut. then you need to make a face for your buddy to do that you need 2 googley eyes 1 pom pom and 1 pipe cleaner . put the googley eyes go on the top the pom pom is the nose and the and if you cut the pipe cleaner in half you can make it a smile. then after that u have to put grass seeds in the little hole then then water it put it in the sun and watch your buddy's hair grow!!!!!
Tie It Up
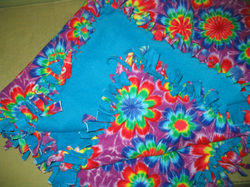
- Line up your two pieces of fleece and pin them together. It is often easy to start with the middle of the blanket and move outward. You will need to stop 3 to 4 inches from the edges.
- Your best bet for making a great blanket is to mark out your strips. You can use a fabric marker or a pencil if you are using the right color of fleece.
- Once you have cut the pieces of fleece to size you will want to cut stripes all along each edge of the fleece. The cuts should be about 3-4 inches into the blanket. How wide you make them is up to you and can range from 1/4 of an inch to 1 inch. Make sure that each strip is being cut into both pieces of flannel.
- Now carefully tie each piece of fringe from the back panel to a piece of fringe on the front panel. Work your way around the entire piece. It is a good idea to tie them twice for a good strong knot.
- To finish the blanket you will want to take thread or yarn and tack the two layers together. If using yarn you can leave these fringe style on one side of the blanket for added interest. Thread can be used by looping it through the two layers a couple of times and then tying it off. Another option is to use thin strips of fleece to tie the two layers together. This gives a great "finished" look about the piece.
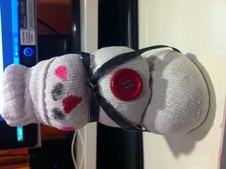
Tube Sock Snowman
Basic Tools and Supplies You'll Need:
- Tube sock - white men's (used here is size 6-11)
- Rubber bands - 3
- Rice - about 4 1/2 cups
- Hot glue gun with glue
- Funnel (canning funnel works great or use a sheet of paper rolled into a funnel)
- Cup for pouring rice (measuring cup works great)
- raffia, ribbon and/or strips of flannel
- buttons
- black sharpie for eyes and mouth, pink can be used for cheeks
- orange pen or orange paint for carrot nose
- googly eyes and other embellishments can be used to spice things up
- Using the canning funnel (or a sheet of paper rolled into a funnel), fill tube sock with 2 -3 cups of rice.
- Stretch and mold the rice into a tight ball at the bottom of sock and secure top with rubber band. then Fill tube sock with about another 1 cup rice and stretch, mold and secure and second tight ball with the second rubber band Repeat this process again with about 1/2 cup rice, making a third and final ball... Fold the very top of the tube sock down over the top ball and flip the rim up to look like the rim of a hat...
- Once everything is positioned well (adults will need to do this part for children), apply hot glue in a circle between each section of the body to keep it in place.
- Apply a couple dots of hot glue under hat to keep it in place.
- Use hot glue as needed when applying eyes, buttons, nose and if needed to secure scarf have fun!!!!!!!!!!!!!!!!..
Dream Catcher
Make a Dream Catcher for Kids
Supplies to get started:
1. Begin by cutting in the center of the paper plate. Leave a rim of 2 inches all around the paper plate
2. Take your hole punch and punch hole in the rim of the paper plate, about ½ inch apart each.
3. Measure out your yarn 5-6 ft long. Tie one end of the yarn to any one of the holes on the rim of the paper plate.
4. Weave the yarn up, over, and all around the paper plate from one hole to the next one. You can make your pattern any way you like. Make sure to loop through each of the punched holes.
5. You can add the craft beads to the middle of the dream catcher with the yarn as you go through the holes. Simply slip them onto the yarn and continue with the next hole. They will appear to be in the middle of the dream catcher.6. Once all of the holes are threaded with the yarn, tie a knot at the end of the yarn with the plate and the last hole.
7. Now, take your hole punch and punch 3 more holes in the paper plate at the bottom of the plate.
8. Cut 3 more pieces of yarn, about 5 inches long each.
9. Take each piece of yarn and tie them to the 3 punched holes at the bottom of the dream catcher.
10. Choose some beads to thread onto each of the 3 yarn pieces and then tie one feather to the end each of the hanging yarn pieces.
11. Take your markers and decorate the edges of the paper plate.
12. Lastly, make a piece of yarn the length you need to hang it on the wall. Punch one more hole to the top of your paper plate dream catcher and tie the yarn to it.
13. Hang your new Dream Catcher in a place where sweet dreams are welcome.
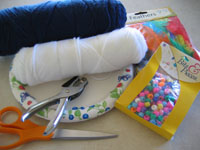
Supplies to get started:
- paper plate
- yarn, any color
- hole puncher
- craft beads
- craft feathers
- color markers
- scissors
1. Begin by cutting in the center of the paper plate. Leave a rim of 2 inches all around the paper plate
2. Take your hole punch and punch hole in the rim of the paper plate, about ½ inch apart each.
3. Measure out your yarn 5-6 ft long. Tie one end of the yarn to any one of the holes on the rim of the paper plate.
4. Weave the yarn up, over, and all around the paper plate from one hole to the next one. You can make your pattern any way you like. Make sure to loop through each of the punched holes.
5. You can add the craft beads to the middle of the dream catcher with the yarn as you go through the holes. Simply slip them onto the yarn and continue with the next hole. They will appear to be in the middle of the dream catcher.6. Once all of the holes are threaded with the yarn, tie a knot at the end of the yarn with the plate and the last hole.
7. Now, take your hole punch and punch 3 more holes in the paper plate at the bottom of the plate.
8. Cut 3 more pieces of yarn, about 5 inches long each.
9. Take each piece of yarn and tie them to the 3 punched holes at the bottom of the dream catcher.
10. Choose some beads to thread onto each of the 3 yarn pieces and then tie one feather to the end each of the hanging yarn pieces.
11. Take your markers and decorate the edges of the paper plate.
12. Lastly, make a piece of yarn the length you need to hang it on the wall. Punch one more hole to the top of your paper plate dream catcher and tie the yarn to it.
13. Hang your new Dream Catcher in a place where sweet dreams are welcome.
Book Worm
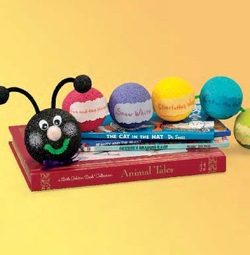
- Balls: 3", one (head); 2-1/2", one for each book read (body); 3/4", two (antennae)
- Disc, 6”
- Acrylic paints, assorted bright colors
- Purple chenille stems, three or more
- 3/4" wiggle eyes, two
- 1/2" pink pompom, one
- Felt scraps, assorted colors
- Ribbon (for bow)
- Toothpicks
- Paper Plate
- Medium flat paintbrush
- Water basin
- Paper towels
- Ruler
- Wire cutters
- Scissors
- Serrated knife
- Cardstock, and black marking pen (optional)
- Thick, white craft glue
- Insert a toothpick into each foam ball to use as a handle while painting, paint each ball the desired color and pick into disc to dry.
- Attach head and body foam balls with chenille stem couplings. To make couplings, cut chenille stem into 1-1/2" lengths and bend each in a U shape. Dip the ends of one U-shape chenille stem into glue; press the ends into back of 3" head ball, leaving a small loop protruding. Hook a second U-shape chenille stem onto this loop, dip the ends into glue, and then press them into the first 2-1/2" body segment ball. Repeat to connect the remaining body segments. If desired, shape soft, natural curves in bookworm’s extended body.
- Glue wiggle eyes to front of head with a pink pompom nose centered in between. Cut a smiling mouth from felt and glue to head. Add other felt facial features as desired. Glue hat to top of head.
- Cut two 3"- 4" chenille stem lengths. Insert and glue one end of each stem in a 3/4" ball and opposite end into head on either side of hat, forming the antennae.
- Continue to add a 2-1/2" ball to worm for each book child reads. Optional: Paint book titles on each body segment or pin on small pieces of cardstock with titles printed on them.
rexlace keychains